The view of Fort Griswold from the top of the Groton Monument in Groton, around 1900. Image from The Battle of Groton Heights (1903).

The scene in 2022:
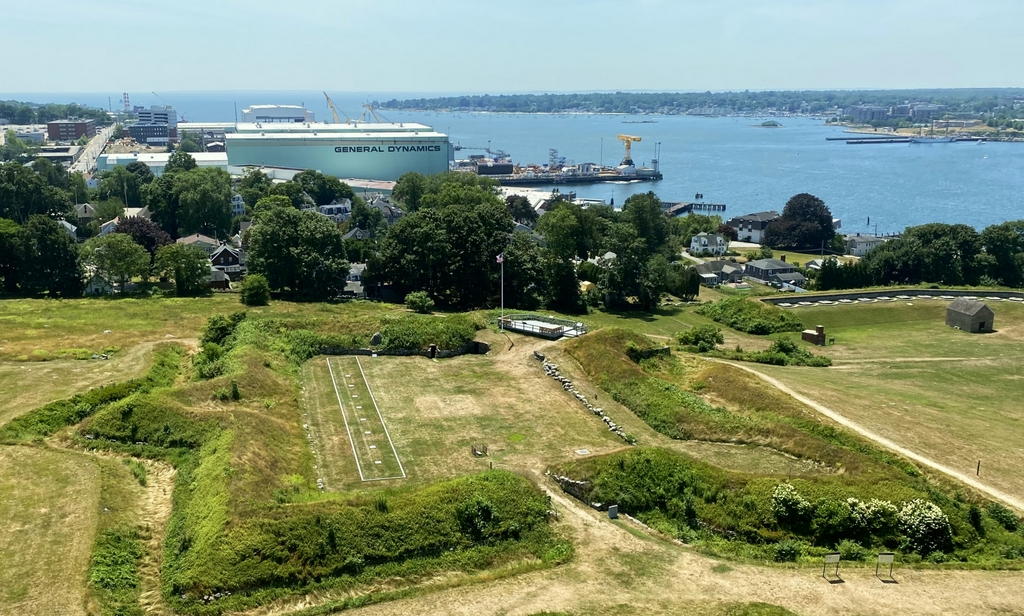
These two photos show Fort Griswold, which was built during the American Revolution on the east side of New London Harbor. Most significantly, the fort was the site of the Battle of Groton Heights on September 6, 1781. This battle is often overlooked, perhaps because it was a British victory that ultimately had little bearing on the outcome of the war. However, it was the largest battle to be fought in Connecticut during the Revolution, and it was also the last major battle in the northern states.
Fort Griswold was built between 1775 and 1778 on Groton Heights, a hill immediately to the east of New London Harbor. The site is less than a thousand feet from the water, yet it rises to about 125 feet in elevation, making it an ideal place for a fort to defend New London, which is located directly across the harbor. It was named in honor of Matthew Griswold, who was at the time the lieutenant governor and would eventually become governor of Connecticut. Aside from this fort, the harbor defenses also included Fort Trumbull in New London, which was named for Jonathan Trumbull, who served as governor from 1769 to 1784. Fort Trumbull is visible in the distance of both of these photos, across the harbor on the far right side of the scene.
Fort Griswold was laid out as a star fort, roughly pentagonal in shape, with bastions projecting outward to enable enfilading fire against attackers. The walls, which were made of stone topped with earth, were thick and relatively low, in order to protect against enemy artillery, and it was surrounded by a ditch to make it more difficult for the enemy to scale the walls. This was a typical fort design for the 18th century, although much smaller in scale than more notable ones of the era, such as Fort Ticonderoga and Fort Crown Point. The main entrance was on the north side, as shown here in the foreground of these two photos, but there was also a sally port on the south side of the fort that led to ditch connecting the fort to the lower battery. On the inside of the fort were the barracks, which were located on the east side, on the spot now marked by a large rectangular outline in the second photo.
Stephen Hempstead, who was one of the fort’s defenders during the battle, provided the following description of Fort Griswold in his subsequent account of the battle:
The fort was an oblong square, with bastions at opposite angles, its longest side fronting the river in a northwest and southeast direction. Its walls were of stone, and were ten or twelve feet high on the lower side, and surrounded by a ditch. On the wall were pickets, projecting over twelve feet; above this was a parapet with embrasures, and within a platform for the cannon, and a step to mount upon to shoot over the parapet with small arms. In the southwest bastion was a flag-staff, and in the side, near the opposite angle, was the gate, in front of which was a triangular breast-work to protect the gate; and to the right of this was a redoubt, with a three-pounder in it, which was about 120 yards from the gate. Between the fort and the river was another battery, with a covered way, but which could not be used in this attack, as the enemy appeared in a different quarter.
These defenses would be put to the test on September 6, 1781, when Benedict Arnold landed around 1,700 British soldiers here in the New London area. By this point the war in the north was winding down, and most of the focus had shifted south, where Lord Cornwallis had taken up a vulnerable position on a peninsula in Virginia. George Washington and Rochambeau had begun marching their army south in the summer of 1781, but Arnold hoped that a raid on New London would distract Washington and take pressure off of Cornwallis.
In conducting the raid, Arnold divided his force of about 1,700 men into two groups of roughly equal numbers. One group, commanded by Arnold himself, landed on the west side of the Thames River in New London. They met with minimal resistance at Fort Trumbull, which had been lightly garrisoned, and the 23 defenders who had been positioned there abandoned the fort after spiking the guns. Those defenders then crossed the harbor to join the American soldiers at Fort Griswold, which was a much more substantial fortification. In the meantime, Arnold had free reign of New London, and he burned a significant portion of it, including over 140 buildings. Adding insult to this injury was the fact that Arnold was a local, having been born and raised in nearby Norwich.
While Arnold was burning New London, the other group of about 800 British soldiers landed in Groton, on the east side of the Thames River. They were commanded by Lieutenant Colonel Edmund Eyre, who had been given the task of capturing Fort Griswold. Rather than attempting a frontal assault directly from the river, Eyre instead landed his men further to the south, at the entrance to the harbor in the distant left side of these two photos. This spot is marked by a small “4” in the first photo. This route of attack enabled him to approach the fort from the southeast, which, as noted in Stephen Hempstead’s account, rendered the lower battery ineffective against them.
According to Arnold’s post-battle report, his orders to Eyre were at least partially based on information that he had received from a Loyalist resident of New London, who informed him that the fort was only partially complete and was only defended by 20 or 30 men. However, in reality the fort had about 160 defenders, and Arnold would soon discover that it was definitely not incomplete. From a vantage point at the old burial ground in New London, Arnold surveyed the fort’s defenses, and subsequently wrote in his report that he “found it much more formidable than I expected, or than I had formed an idea of, from the information I had before received.” This led him to countermand his original orders to Eyre, but the message arrived after the battle had already started.
Prior to the battle, Eyre had demanded the unconditional surrender of the fort. With about 800 soldiers, he had a significant numerical advantage, but the fort’s commanding officer, Lieutenant Colonel William Ledyard, refused to surrender. Throughout the war, the British tended to avoid assaulting fortified, elevated American positions, likely in part because of their experiences early in the war at Bunker Hill. Ledyard may have had Bunker Hill in mind on this day, but he also believed that there were reinforcements who would arrive momentarily, so he held his position.
After the rejected surrender demand, Colonel Eyre concentrated his attack on the southwest bastion of the fort, located in the far right-hand side of the fort from the perspective of these two photos. They suffered heavy casualties in the process, including Major William Montgomery, who was impaled with a pike by Jordan Freeman, a formerly enslaved man who was subsequently killed in the battle.
According to Stephen Hempstead’s account, at one point in the battle the fort’s flagpole was shot down. The flag was quickly raised on a pike, but Hempstead believed that the British had interpreted the initial falling of the flag as a sign of surrender. This, he asserted, had given them the added motivation to get over the walls because they believed victory was at hand. It is also possible that the British may have seen the action as a feigned surrender designed to draw them into a vulnerable position. If that was the case, it may explain their subsequent actions once they breached the fort.
Regardless of exactly how the fallen flag may have influenced the British, they managed to get some of their soldiers over the walls. They then opened the gate from the inside, allowing the rest of the soldiers to enter the fort. It was at this point that Colonel Ledyard recognized that the battle was lost. Stephen Hempstead, who had been wounded by a musket ball in his left arm in the fighting right before this, described the ensuing events in his narrative:
Colonel Ledyard, seeing the enemy within the fort, gave orders to cease firing, and to throw down our arms, as the fort had surrendered. We did so, but they continued firing upon us, crossed the fort and opened the gate, when they marched in, firing in platoons upon those who were retreating to the magazine and barrack-rooms for safety. At this moment the renegade Colonel Beckwith commanding, cried out “Who commands this garrison?” Colonel Ledyard, who was standing near me, answered “I did, sir, but you do now,” at the same time stepping forward, handed him his sword with the point towards himself. At this instant I perceived a soldier in the act of bayonetting me from behind. I turned suddenly round and grasped his bayonet, endeavoring to unship it, and knock off the thrust, but in vain. Having but one hand, he succeeded in forcing it into my right hip, above the joint, and just below the abdomen, and crushed me to the ground. The first person I saw afterwards was my brave commander, a corpse by my side, having been run through the body with his own sword, by the savage renegade.
Over the years there has been debate and speculation about exactly who killed Colonel Ledyard, but American accounts of the battle generally agree on what happened next. Up to this point, only about six or seven Americans had been killed in the battle, according to Hempstead’s estimate. However, many more would be killed here in the fort after this attempted surrender. Hempstead continued by writing:
Never was a scene of more brutal wanton carnage witnessed than now took place. The enemy were still firing upon us in platoons, and in the barrack-rooms, which were continued for some minutes, when they discovered they were in danger of being blown up, by communicating fire to the powder scattered at the mouth of the magazine while delivering out cartridges; nor did it then cease in the rooms for some minutes longer. All this time the bayonet was “freely used,” even on those who were helplessly wounded and in the agonies of death. I recollect Captain William Seymour, a volunteer from Hartford, had thirteen bayonet wounds, although his knee had previously been shattered by a ball, so much so, that it was obliged to be amputated the next day. But I need not mention particular cases. I have already said that we had six killed and eighteen wounded previous to their storming our lines; eighty-five were killed in all, thirty-five mortally and dangerously wounded, and forty taken prisoners to New York, most of them slightly hurt.
Another American soldier, Rufus Avery, gave a similar account in his own description of the battle:
They killed and wounded nearly every man in the fort as quick as they could, which was done in about one minute. I expected my time to come with the rest. One mad-looking fellow put his bayonet to my side, and swore, “bejasus, he would skipper me.” I looked him very earnestly in the face and eyes, and asked for mercy and to spare my life. He attempted three times to put the bayonet in me, but I must say I believe God forbade him, for I was completely in his power, as well as others that was present with the enemy. The enemy at the same time massacred Lieut. Enoch Stanton within four or five feet of me. A platoon of about ten men marched up near where I stood, where two large outer doors to the magazine made a space wide enough for ten men to stand in one rank. They discharged their guns into the magazine among the dead and wounded, and some well ones, and some they killed and wounded.
Like Hempstead, Avery also commented on how the British became concerned that they would ignite the powder magazine. He wrote:
That platoon fell back, and another platoon came forward to discharge their guns into the outer part of the magazine, where the others did. As they made ready to fire, Capt. Bloomfield came suddenly round the corner of the magazine, and very quickly raised his sword, exclaiming, “Stop firing! You’ll send us all to hell together ! ” Their language was bad as well as their conduct. I was near him when he spoke. Bloomfield knew there must be, of course, much powder scattered about the magazine, and a great quantity deposited there, but I expect the reason it did not take fire was that there was so much human blood to put it out. They did not bayonet many after they ceased firing their guns. I was amongst them all the time, and they very soon left off killing, and then went stripping and robbing the dead and wounded, and also those that were not wounded.
As the battle came to an end, the British began taking prisoners. They also attempted to destroy the fort itself, but they were not successful. In his official report to his commanding officer, Sir Henry Clinton, Arnold described how:
A very considerable Magazine of Powder, and Barracks to contain 300 men, were found in Fort Griswold, which Captain Lemoine, of the Royal Artillery, had my positive directions to destroy. An attempt was made by him, but unfortunately failed. He had my orders to make a second attempt. The reason why it was not done Captain Lemoine will have the honor to explain to your Excellency.
Arnold’s report did not specify exactly why the first attempt failed, or why the second one was not carried out, although his tone clearly indicated frustration with Lemoine’s inaction. However, Lemoine did subsequently offer his explanation to Clinton, who indicated that he was satisfied with the reason.
Based on other accounts, the reason for the failure of the first attempt appears to have been due to interference by Americans who disrupted the trail of powder that was supposed to ignite the magazine. Another American who was present at the battle, John Hempsted, described the incident in a narrative that was somewhat less polished than Arnold’s report:
But the Enemy Intended to blow up the fort for they Stroed a train of powder from the gate to the magesean & itt burnt from the gate about half way to the magesean, and the Comunication was cut of by a mans fingers which Sean in the durt.
The Americans ultimately managed to save the fort itself, but overall they had sustained heavy losses in the battle. Different sources give somewhat different figures for the total number killed, wounded, and captured, but Stephen Hempstead’s estimates, which were quoted earlier, seem to be reasonably correct, with about 85 killed, 35 wounded, and 40 taken prisoner. The wounded figure included those who would subsequently die of their wounds, along with those who were deemed to be too injured to be taken prisoner, including Stephen Hempstead. Among the prisoners was Rufus Avery, who was subsequently transported to New York.
In his report, Benedict Arnold also stated that 85 Americans had been killed, although he also estimated that 60 were wounded (“most of them mortally”), and 70 captured. These latter two figures are likely inflated, since that would put the total number killed, wounded, and captured at 215, which was significantly higher than the total number of defenders who were present in the fort. As for the British, Arnold reported 48 killed and 145 wounded, and also noted that three of the wounded officers had since died. Other wounded British soldiers appear to have died of their wounds while making the voyage back across the Atlantic.
Based on these numbers, both sides had similar numbers of casualties, although for the Americans these represented a much higher percentage of their total force. With at least 85 dead in the battle, plus others who were mortally wounded, it meant that well over half of the fort’s defenders died during or soon after the battle. And, with nearly all of the remaining American soldiers either wounded or taken prisoner, it meant that they had a casualty rate of nearly 100%. Because of this, and because so many of the Americans were killed after they attempted to surrender, the battle is sometimes referred to as the Fort Griswold Massacre. At least one modern historian, Jerald P. Hurwitz, has even taken this a step further, declaring it to be the “Alamo of the Revolution” in his 2020 book of the same name.
For the British, the battle probably brought back memories of the Battle of Bunker Hill, which had been fought six years earlier at the start of the Revolution. Like Fort Griswold, it was a battle that they technically won, but it was largely a pyrrhic victory that involved heavy losses without gaining any significant strategic advantage. It would also prove to be their last major victory of the war. The goal of distracting Washington’s army did not succeed, and they continued on their way to Virginia despite the raid on New London and Groton.
Just 22 days after the battle here in Groton, the combined French and American armies began laying siege to General Cornwallis on the Yorktown Peninsula. This ultimately led to his surrender on October 19, 1781, which effectively ended the American Revolution. Interestingly, the total number of American and French soldiers killed in the three-week siege was about 88, which was approximately the same number who were killed here in Fort Griswold in the span of 40 minutes.
Following the was, Fort Griswold would continue to be used as a harbor defense fort for many years, although primarily in a supporting role, with Fort Trumbull becoming the main fort here in New London. Fort Griswold saw use during the War of 1812, and then in the early 1840s the lower batter was rebuilt, as shown on the right side of these photos. This work included emplacements for 20 guns, along with a powder magazine and a shot furnace. The latter was used to heat cannonballs before firing them, in order to start fires when they struck wooden warships. Both structures were built in 1843, and they are still standing today, with the magazine visible on the far right and the furnace a little to the left of it.
In the meantime, the battlefield also became the site of one of the earliest large-scale monuments to the American Revolution. In 1825, work began on a 127-foot monument just to the north of the fort. The cornerstone was laid on September 6, 1781, on the 44th anniversary of the battle, and approximately 8,000-10,000 people attended the ceremony, including 18 survivors of the battle. One of them even wore the same vest that he had worn during the battle, complete with a musket ball hole and other damage from the battle.
This event occurred less than three months after the cornerstone was laid for the more famous Bunker Hill Monument in Charlestown, Massachusetts. It had a design that was similar to the Bunker Hill Monument, although it was topped with a cupola rather than a traditional obelisk point. It was much shorter than Bunker Hill, standing at 127 feet compared to 221 feet. However, it also took much less time to build; it was completed in 1830, compared to 1843 for the Bunker Hill Monument.
The design of the Groton Monument was later modified for the centennial of the battle in 1881. The original cupola was removed, and the top of the monument was reconstructed to make it a true obelisk. This project added eight feet to the monument’s height, which now rises 135 feet above the battlefield.
The interior of the monument has a spiral staircase that leads to an observation platform with one window on each side of the monument. These windows provide expansive views of New London, the harbor, and the surrounding countryside, along with a birds-eye view of Fort Griswold, as shown in these two photos. From here, it is easy to get a sense of the layout of the fort and the topography around it, and also to visualize how the battle unfolded.
Even after the completion of the monument, the fort itself would remain an active military installation for many years. The lower battery, which had been reconstructed in the 1840s, was upgraded again around the time of the Civil War, including the installation of Rodman guns. It would ultimately continue to be used until after World War II, although for most of this time it was only lightly garrisoned, and never saw any other combat.
The site of the fort was subsequently transferred to the state, which established the Fort Griswold State Park here in 1953. Today, the park includes the fort itself, along with the monument and a small museum adjacent to it in the Monument House. Visitors can climb up the 166 steps to the top of the monument, and they can also explore the fort, which is open for self-guided tours.
Overall, the battlefield has not changed much in the 120 years or so since the first photo was taken. Although the battle is often overlooked when compared to the other major battles of the war, the site here has remained well-preserved, even as the surrounding area has been extensively developed over the years. There are now far more houses on the other side of the battlefield than there were in the first photo, and probably the most significant change is the large General Dynamics Electric Boat shipyard in the distance. This facility specializes in building nuclear-powered submarines for the U.S. Navy, so its proximity to Fort Griswold provides for an interesting contrast to the Revolutionary-era fort in the foreground.